French translation
(Obvious menu items have been left out)
File > New
Creates a new song. It will appear as a new tab in the bar that shows currently open sequences (a la Firefox tabs). You can then
just click on the newly appeard tab to switch to this song.
File > Song Info
Midi files allow their author to specify information like title and copyright.
Edit > Paste at cursor
Pastes the selected notes near the cursor (using this item from the menu has little use of course, you need to use the keyboard
shortcut : CMD/CTRL + SHIFT + V).
Edit > Select notes...
Select notes according to criteria. Most of these criteria are based on a currently selected note. For instance, if you want to
select all G notes, you can just select one G notes, choose this option in the menu, check "select all notes that have the same
pitch", click OK, and it’s done!
You can also use this feature to select all notes within a range of measures (i.e. if you want to select all notes from measures
65 to 78)
Edit > Snap notes to grid
Aria uses a "magnetic grid" to ensure that notes have a precise location and duration, corresponding to those of music theory.
If you end with notes that seem to have unusual lengths/locations, select the notes, select an appropriate grid size (see below in
track docs) and select this option.
Edit > Remove Overlapping Notes
If you copied a hundred notes, pasted them right on top of their original ones, and accidentally unselected them before moving them
- all notes now have doubles! Fortunately you can just select those notes and use this feature. It can be used in other cases too -
you get the picture.
Track > Properties
Lets you set the current track's properties, including (1) default volume to use for new notes, (2) background (displays notes from
other tracks, currently works only in Piano editor).
Settings > Follow Playback
If checked, when you hit play, the scroll will scroll as the song moves on so that the currently played part is always visible on
screen.
Settings > Play during edits
When you edit a song, Aria offers you to play the notes you’re manipulating, without you ever pressing play. Here you can
decide how often you want it to play these previews.
Settings > Channel management
Midi considers tracks and channels as two seperate entities. In the midi specs, tracks are a group of notes, whereas channels are
where the tracks actually play their notes. This menu allows you to choose whether you want to manually be able to specify channels
or whether you prefer that Aria hides this concept. When this is enabled, you will see a new widget appear on the track header (see
below).


This bar shows the number of each measure.
If you right-click near the line between two measures, a pop-up menu will appear, allowing you to insert empty measures between
these two.
You can also click on a measure to select it. This will select all notes contained in this measure. You can do the same for
multiple measures by dragging the mouse. You can deselect them by deselecting their notes, e.g. by clicking in an empty space in
the tracks.
Ctrl-clicking or alt-clicking on a measure will also move the playback cursor to this measure, so that next time you press play
the song starts there.
Once you have selected one or many measures, you can right-click on them. This will show a pop-up enabling you to completely remove
these measures.
![]()
While the song is playing, the current part of the song that is played may not visible because the horizontal scrollbar is placed
to show another location. In this case, red arrows will appear at either end of the bar, telling you where current playback is
relative to your current location. Clicking on the arrow will take you directly to the part of the song currently being played.

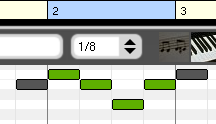
If you check Expanded measure management in the settings menu, the measure bar will become wider and you will be able t
change the time signature at any time during the song. To add a time signature change, just click in the lower half of the
expanded measure bar. A new signature change event will appear. To select an event, just click on it. It will become brighter and
bigger (see 3/4 signature at measure 2 in above picture) Clicking on the red square next to a time signature change will prompt a
pop-up allowing you to edit the value. To remove an event, right-click on it and select Remove time sig change.
When you create a new song or just open Aria, you get one track in keyboard view. You can add and delete tracks as you wish with
the "Tracks" menu.

 Collapse It enables you to collapse or expand the track.
You can collapse a track when you don’t need it for now, so that it doesn’t uselessy take place on the screen. When a
track is collapsed, the editor is hidden and only the header (what you see on the screenshot) remains. You can bring the track
back by clicking again on the same triangle.
Collapse It enables you to collapse or expand the track.
You can collapse a track when you don’t need it for now, so that it doesn’t uselessy take place on the screen. When a
track is collapsed, the editor is hidden and only the header (what you see on the screenshot) remains. You can bring the track
back by clicking again on the same triangle.
 Track volume Allows you to select a track-wide global
volume. For instance you can make one track quieter than another by using this.
Track volume Allows you to select a track-wide global
volume. For instance you can make one track quieter than another by using this.
 Mute It allows you to mute the track. Click on the speaker: a X
appears on it. Next time you hit play, the track will not play anything. Click again to unmute.
Mute It allows you to mute the track. Click on the speaker: a X
appears on it. Next time you hit play, the track will not play anything. Click again to unmute.
 Solo A track marked as solo will be the only track heard
when you play the sequence. Marking a track as solo effectively mutes all other tracks. Click again to remove.
Solo A track marked as solo will be the only track heard
when you play the sequence. Marking a track as solo effectively mutes all other tracks. Click again to remove.
 Maximize or Dock When you definitely don’t need a track for
some time, you can click on the second button (down arrow). This track will completely disappear from the track area, moving to
the small bar at the bottom of the window - the Aria dock. When you want the track back, click on its name in the dock
and it’s back.
Maximize or Dock When you definitely don’t need a track for
some time, you can click on the second button (down arrow). This track will completely disappear from the track area, moving to
the small bar at the bottom of the window - the Aria dock. When you want the track back, click on its name in the dock
and it’s back.
If you would like to maximize a track, click on the left icon. The track will then take the whole screen. In this state, you can
switch between tracks by using the bar at the bottom.
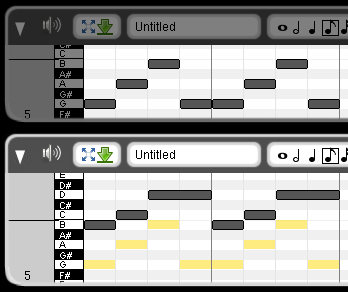
The long text area with "Untitled" in it is the name of the track. Click on it, and enter any name you like.
The combo box that contains notes is the magnetic grid size. The magnetic grid allows you to snap notes durations and
locations to standard musical theory ones. In this combo box, you can choose the smallest note precision you want to use right now,
simply by clicking on it. You can also click on the triplet icon to toggle triplets on or off. Click on the arrows of the combo
for more choices.


 Editor These indicate the current editor (how the notes are displayed and edited). You can click on the
piano to go in piano roll mode, you can click on guitar to get a tablature view, etc. (See editors below for more info).
Editor These indicate the current editor (how the notes are displayed and edited). You can click on the
piano to go in piano roll mode, you can click on guitar to get a tablature view, etc. (See editors below for more info).
The last field at the right of the track header is the instrument used to play the notes. Click on it and you will be able to
choose any instrument from the 128 standard midi instruments, placed in various categories.
 Channel
This widget will only appear if you turned channel management to manual (see Settings menu above). It allows you specify in which
channel this track will play. (In the midi specs, there are 16 channels, 0 to 15, where channel 9 is drums).
Channel
This widget will only appear if you turned channel management to manual (see Settings menu above). It allows you specify in which
channel this track will play. (In the midi specs, there are 16 channels, 0 to 15, where channel 9 is drums).
You can resize a track by dragging its bottom.
You can reorder tracks by grabbing (hold down the mouse on) the line marking the upper limit of a track, just above the track
header. You will then be presented a list of all tracks, all you need to do is place the mouse at the new location and release mouse
button.
Piano editor
This is the default view. It shows a simple piano roll with the notes on it.
To add a note, simply hold the mouse button down and drag horizontally on the track. When you release the mouse, a note
will be placed where you clicked, with the length of your frag. Try it, it’s easy! There is a preview to show you where the note
will be when you release the mouse.
To select a single note, you can simply click on it. Selected notes appear colored in tones of yellow/green.
To select many notes, you can simply drag the mouse across the track. At first, it might look like Aria wants to add a
new note, but don’t bother. Once you have moved the mouse enough vertically, it will understand you want to select and will
instead display a selection rectangle like you can see in all apps. All notes in the rectangle when you release the mouse will be
selected.
If you have some notes already selected, and want to select more, hold down shift while selecting additionnal notes.
If you have some notes already selected, but want to unselected specifically some of them, hold down alt and click on
them.
You can play selected notes by pressing space bar.
To change the volume of a note, right-click on it. A pop-up window will appear. You can then either drag the slider or
manually enter a value and press enter. Midi volumes range from 0 (inaudible) to 127 (loudest). If you right-click on a bunch of
selected notes, it will set the volume for all notes. If you want to cancel entering anew volume, press escape.
The color of a note also shows its volume. Loud notes are drawn darker that soft ones.
To move a note, you can just click on it, hold the mouse button down and drag it to its new location. You can
also drag a bunch of selected notes the same way, by dragging.
Alternatively, you can move selected notes by pressing the arrow keys on your keyboard.
To change the duration of one (or many) note, select it, hold down command or control key, and hit the left or
right arrow key on your keyboard. Each time you press an arrow key, the note will be resized in the direction the arrow
points. (Try it! It’s clearer when you see it)
You can delete selected notes by pressing backspace or delete keys on the keyboard.
You can move notes one octave up or down by using shift + up/down keys, and to the next or previous measure
with shift + left/right keys.
You may also duplicate notes by dragging them while holding down control (or command for OSX users).
Guitar Editor
This editor allows you to edit your song as a guitar tablature. (If you don’t know what tablature is, or don’t play
guitar, you probably won’t be interested by this editor)
You may want to read the section about Piano editor, since everything from Piano editor also applies in Guitar editor.
In guitar editor, when you move a note up or down on the strings, it will keep the same fret number, and its pitch will adapt to
its new string.
If you want to move a note vertically but keep same pitch (for instance, 10 on A string has the same
pitch as 5 on D string and same pitch as 0 on G string) Aria can do that for you, simply select the note, hold down shift, and
hit the up or down arrow key. Nothing will happen if you are trying to move a note to a string where it cannot be played.
If you want to change the fret number, simply select a note a press the appropriate number key, either in the num pad
at the right of the keyboard, or in the numeric keys at the top of the keyboard. For numbers higher than 9, you can hold down
the shift key and press a number. For instance, shift+5 will be 15, shift+7 will give 17. You may also use keyboard shortcuts
command + up (or control + up) and command + down (or control + down) to increase or decrease a note's
fret number.
You can also change the tuning of the guitar by clicking on the string names on the left and selecting a new tuning.
If some notes, mainly from an imported midi file, or that were added in another editor, don’t seem to be placed on the right
strings (e.g. many notes are played simultaneously on the same string, or a chord that could be played on 3 consecutive strings in
split, etc.) you can also choose "Rearrange selected notes" from the drop-menu when you click on the left part of the editor
(the part with string names). It will attempt to rearrange notes in a more meaningful way. (Right now this feature is not completed
and may not always give right results, but overall it’s not bad)
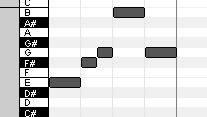
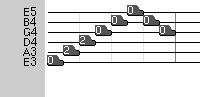
Score Editor

Allows you to edit music with a notation closer to classical music notation.
This editor works very similarly to piano editor, so if you are not used to working with keyboard editor you may want to try that
first.
When you move a note up or down, it will by default move it vertically to the next score line.
If you instead want to move a note by semi-tones (e.g. in order to introduce accidentals) simply hold down the shift key while
pressing the up/down arrow keys. You can also use the sharp/flat/natural buttons found in the header of the track:

If you click on the left part of the area, where you can see the G and F clefs, you will presented a menu. This menu will
enable you to:
Drum Editor
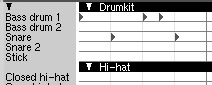
Allows you to edit drums. When you are in this mode, the set of instruments proposed to you is different.
Midi allows only one drum channel per song. It’s okay if you use more than one drum track in Aria, however only one
drumset can be used when playing and exporting. (For instance, you can’t have a room kit in one track and an orchestral
kit in another)
You may want to read the part about Piano editor, since it mostly works the same, with the exception that drum hits don’t
have a duration. When you add a drum, no need to drag mouse, just click where you want to add a drum hit.
Drums are organised in sections - you can hide a section you don’t use by clicking on the little white triangle beside its
name.
Just above the name of the first drum is a black collapse/expand arrow. Clicking on it will hide all unused drums.
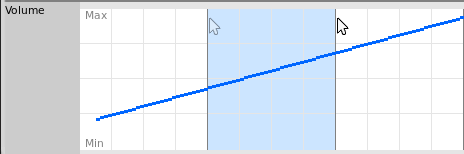
Controller Editor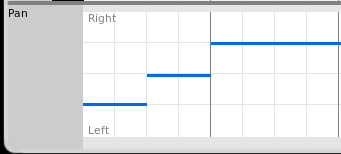
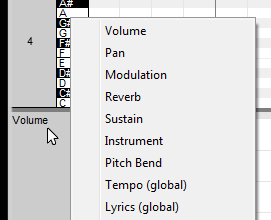
Several controllers, like volume, tempo or pitch bend,
allow you to select a value between a minimum and a maximum.
These controllers appears as a pane with a value on top and a value on the bottom.
You can firstly add "sudden" changes with a single click, the horizontal position being the time where
it happens, the vertical position being how much effect you want. In the example below, panning starts on the
left, then switches to center on beat 2, and switches to right on measure 2.
If you do not want a sudden change, but rather a progressive slide, you can hold down a click and drag. This will create a line following the cursor that you can use for creating progressive effect changes.
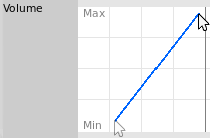
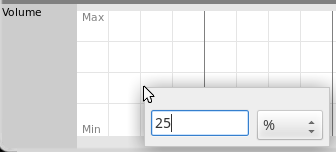
You may also right-click anywhere in the editor to type in a specific value.
As when editing notes, everything you do in the controller editor is constrained by the currently active magnetic grid.
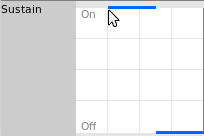
Some controllers like "Sustain" may only be on or off. Working with such controllers is very similar to numeric controllers described above; the main difference is that you can only add changes at the top and the bottom of the editor, the top being "On" and the bottom "Off"
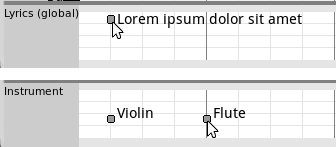
Finally, there are other controllers like "Lyrics" or "Instrument" that simply work by clicking in the editor and you will be prompted for information relevant to the context.
You can select in all controllers by holding down the shift key on your keyboard and dragging. You can then delete
the selected part by pressing backspace or delete keys on the keyboard.
You can unselect the selection by holding down shift and clicking without dragging, or simply choosing "Select none" from the
menus.